In this step (called Finalize on screen) you add the contact person people should reach, and the photos of the property.
Contact details
Every listing needs at least one contact with a name and phone number. Your saved main contact is filled in for you.
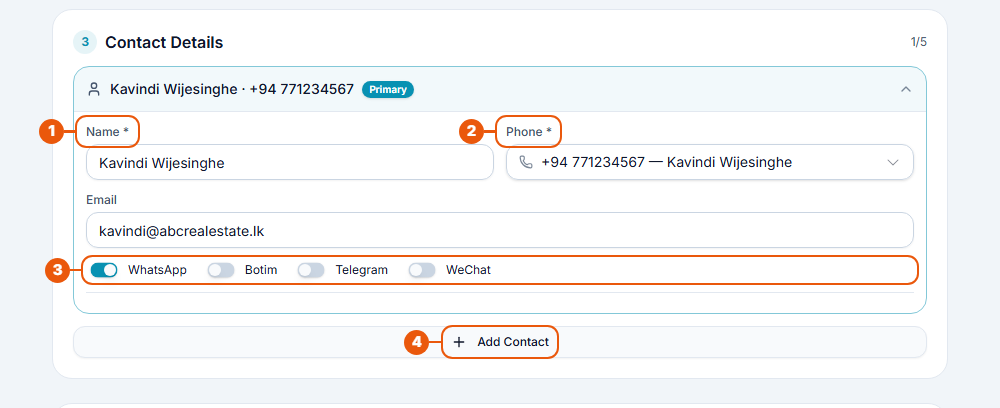
Name (required): the contact person's name.
Phone (required): choose one of your saved contacts from the list, or add a new one.
Messaging apps: switch on the apps this person uses: WhatsApp, Botim, Telegram or WeChat. Visitors see a button for each one.
Add Contact: add another contact person to this listing. The counter at the top right (for example 1/5) shows how many you've added.
One contact is marked Primary. That's the main contact, shown first on the listing.
You can manage your saved contacts any time on the Contacts page. See Managing Listing Contacts.
Property photos
You need at least 3 photos, and can add up to 12.
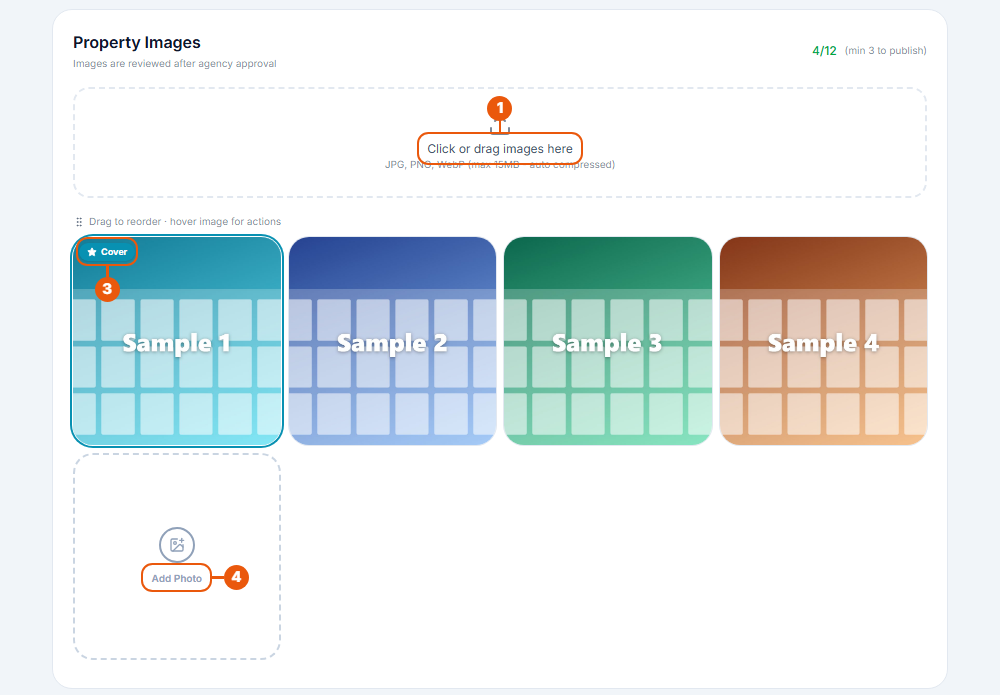
Upload box: click it and choose your photos, or drag photos onto it. You can add several at once.
Counter: how many photos you've added, out of the maximum. It turns green when you have enough.
Cover: the first photo is the cover photo, shown in search results. Drag a photo to the first place to make it the cover, and drag the others into the order you want.
Add Photo: add more photos.
Move your mouse over a photo to see its options, such as removing it.
Photo rules
JPG, PNG or WebP, up to 15 MB each. Large photos are made smaller for you automatically.
Use clear, well-lit photos of the property itself.
Photos are checked when your listing is approved. Only photos that pass the check appear on the website.
Continue
Click Review Listing at the bottom of the form.
Common messages
Message
What to do
"At least one contact is required"
Add a contact person.
"Contact 1: Name is required" / "Phone is required"
Fill in the missing name or phone number.
"Please mark at least one contact as primary"
Choose which contact is the main one.
"Please upload at least 3 images to continue"
Add more photos.
"Maximum 12 images"
Remove some photos before adding more.
"File too large (max 15 MB)"
Use a smaller photo.
Next step
Was this article helpful?
If you still have questions, our support team is here to help.
Submit a Support TicketNot signed in? Sign in first
